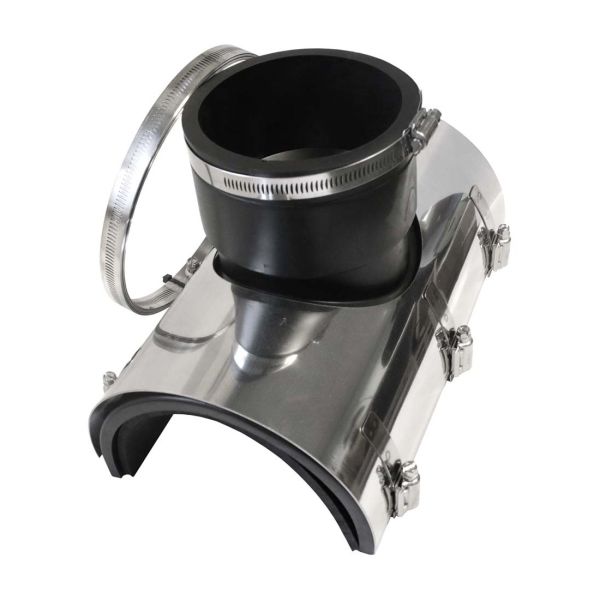
The Fernco (previously known as Flexseal) TA Saddle, is designed for creating lateral connections to smooth PVC sewer or surface water pipes. This saddle offers a flexible and cost-effective alternative to traditional pipe junctions, particularly when connecting lateral pipes (branch pipes) from new build houses or road gullies into main drain pipelines.
Key Features
Flexible Installation: Suitable for 45° and 90° lateral connections, providing versatility in pipe system layouts.
Easy and Quick Fitting: Eliminates the need for pre-ordered factory-made junctions, allowing for rapid on-site installation.
Durable and Robust: Made from high-quality materials, ensuring longevity and resistance to typical site conditions.
Cost-Effective: Reduces material and labour costs compared to traditional methods.
Pressure Resistance: Withstands internal pressure up to 0.5 bar (7.25 psi).
Specifications
Size Range: Suitable for main pipes with a minimum diameter of 160mm.
Material: Comprised of flexible PVC and 1.4301 (304) Stainless Steel. Options for different material compositions are available upon request.
Temperature Range: Effective from -34°C to 40°C continuously, and up to 60°C intermittently.
Pressure Rating: Rated for 0.5 bar (7.25 psi).
SKU
Fernco Code
External Diameter Of Main Pipe (mm)
PVC Lateral Pipe (mm)
Connection Angle (degrees)
484793
TA11045
160 - 400
110
45
484794
TA11090
160 - 400
110
90
484795
TA16045
200 - 400
160
45
484796
TA16090
200 - 400
160
90
484797
TA20045
300 - 600*
200
45
How and Where to Install a TA Saddle
Installing the Fernco TA Saddle involves:
Excavation and Marking: Excavate around the pipe to ensure adequate working space. The space is required under the pipe as the securing clamp band will pass underneath. Determine the required position for the saddle and use the gasket as a template to mark out the hole and the edges of the saddle. Ensure correct direction for 45º saddles.
Cutting the Hole: Cut a hole in the pipe along the marked area. The hole should allow the saddle to make full contact with the pipe's surface.
Cleaning and Deburring: Remove any excess material from the drilling and clear off the swarf or flashing from the edges of the hole using the deburring tool provided. This includes internal edges to ensure a smooth installation.
Repairing Spalling: Repair any spalling around the hole on concrete and clay pipes if it extends beyond 20mm from the edge of the hole.
Positioning the Saddle: Position the gasket and saddle over the hole using the previously applied markings. Ensure the stainless steel saddle is centrally located on the PVC product.
Securing the Saddle: Adjust the perforated bands to fit the pipe's outside diameter. Drive the bands into the housings along one edge of the stainless steel saddle, then slide them under the pipe and into the housings on the opposite side. Tighten all clamps evenly to the required torque of 13Nm.
Installing the Lateral Pipe: Position the lateral pipe into the saddle and tighten this clamp band to 6Nm.
Backfilling: Replace and compact the bedding material under and around the pipe. Recheck the clamps to ensure they meet the required torque. Protect any part of the saddle not covered by the stainless steel shroud from deformation or puncturing during backfilling.
Final Checks and Protection: Ensure the core hole is perpendicular to the pipe for a proper fit. Backfill with care to protect the exposed PVC, potentially casting it in concrete before the final backfill.
Downloads
Fernco TA Saddle Datasheet
If you require any further information, our excellent customer service team is here to help so please call us on 01794 835835.